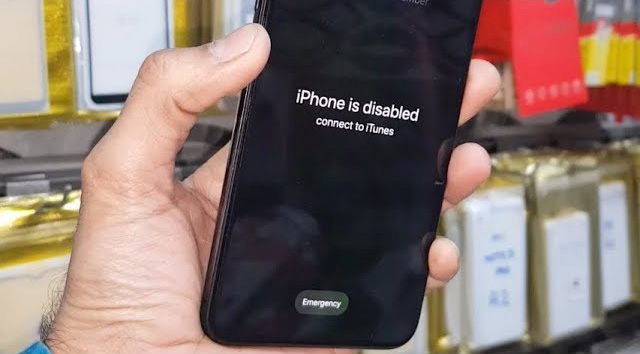
Before diving into detailed steps, here’s a concise overview: When your iPhone displays “iPhone is disabled, connect to iTunes,” it means too many incorrect passcode attempts have locked the device. You can restore access by using Recovery Mode or DFU Mode via iTunes/Finder, or by erasing the device remotely through iCloud’s Find My service—each method will erase data, so backups are crucial. Below, you’ll find in-depth guidance on each approach, tips to prevent lockouts, and troubleshooting advice to fix a disabled iPhone efficiently.
Understanding the “iPhone Is Disabled, Connect to iTunes” Error
When an incorrect passcode is entered six times in a row, iOS automatically disables the iPhone to protect your data. The disabled state prevents further passcode attempts and prompts you to connect to iTunes or Finder on macOS to restore the device. Depending on your setup, you can restore via a synced computer or use iCloud to erase and reset your device remotely.
Important Considerations Before You Begin
- Data Loss Risk: All restore methods erase your data. Ensure you have a recent backup via iCloud or iTunes/Finder before proceeding.
- Required Tools: You’ll need a Mac or PC with the latest iTunes (Windows 8 or later) or macOS Finder (Catalina or newer) installed, plus a compatible Lightning cable.
- Apple ID Credentials: For iCloud erasure, have your Apple ID and password ready, and ensure Find My iPhone is enabled on the device.
- Internet Connectivity: A stable internet connection is required to download iOS software during the restore process.
Method 1: Restore with Recovery Mode via iTunes/Finder
Recovery Mode allows you to restore your disabled iPhone by forcing it into a state where iTunes/Finder can detect and reinstall iOS.
Step 1: Turn Off Your iPhone
- Disconnect your iPhone from the computer if connected.
- Power off using the specific button combination for your model:
- iPhone 8 and later: Press and hold Side + Volume Down until the power-off slider appears.
- iPhone 7/7 Plus: Hold Side until slider appears.
- iPhone 6s and earlier, SE (1st gen): Hold Home (or Top) button until slider appears.
Step 2: Enter Recovery Mode
- Identify the button for your model to force Recovery Mode:
- iPhone 8+ models: Side button.
- iPhone 7/7 Plus: Volume Down button.
- iPhone 6s and earlier: Home button.
- While holding the correct button, immediately connect your iPhone to the computer.
- Keep holding until the “Connect to iTunes” (Recovery Mode) screen appears, then release.
Step 3: Restore Your iPhone in iTunes/Finder
- On your computer, open iTunes (Windows) or Finder (macOS Catalina+).
- You’ll see a prompt indicating a device in Recovery Mode; click Restore.
- iTunes/Finder downloads the latest iOS and restores the iPhone. If the download exceeds 15 minutes and exits Recovery Mode, repeat Step 2 after the download finishes.
- After restoration, set up your iPhone as new or restore from backup.
Method 2: Use DFU Mode for a Deeper Restore
Device Firmware Update (DFU) Mode is a lower-level restore option that can resolve more serious software issues but also erases the device.
- Connect to Computer: Launch iTunes/Finder and connect the iPhone.
- Enter DFU Mode:
- iPhone 8 and later: Quickly press Volume Up, then Volume Down, then hold Side until screen goes black; then hold Side + Volume Down for 5 seconds, release Side and continue holding Volume Down for 10 seconds.
- iPhone 7/7 Plus: Hold Side + Volume Down for 8 seconds, release Side, continue holding Volume Down until iTunes/Finder alerts you of a device in recovery.
- iPhone 6s and earlier: Hold Home + Side/Top for 8 seconds, release Side/Top, continue holding Home until detected.
- Restore: Click Restore iPhone in iTunes/Finder.
Method 3: Erase Remotely via iCloud Find My iPhone
If you cannot access a computer, you can erase your disabled iPhone remotely if Find My iPhone is enabled:
- On another device or computer, go to iCloud.com and sign in with your Apple ID.
- Open Find iPhone, select All Devices, then your disabled iPhone.
- Click Erase iPhone to wipe the device, removing the passcode lock.
- After erasure, restore from an iCloud backup during setup or configure as new.
Troubleshooting Common Issues
- iPhone Won’t Enter Recovery/DFU Mode: Ensure you’re using the correct button sequence and a functional cable. Try different USB ports or a different computer.
- iTunes/Finder Doesn’t Recognize iPhone: Trust the computer on your iPhone if prompted, update iTunes/Finder to the latest version, and restart both devices.
- Restore Fails or Gets Stuck: Check your internet connection, disable security software that might block downloads, and retry. If issues persist, contact Apple Support.
Preventing Future Lockouts
- Use Biometric Authentication: Enable Face ID or Touch ID to reduce reliance on passcodes and accidental lockouts.
- Set a Memorable Passcode: Avoid overly complex or easily forgotten codes.
- Enable Auto-Backup: Turn on iCloud Backup (Settings > [Your Name] > iCloud > iCloud Backup) to secure your data without manual effort.
- Limit Passcode Attempts: Be cautious when granting access to others, and educate family members on correct entry procedures.
- Keep Software Updated: Regular iOS updates include bug fixes that can prevent unexpected disables.
- Facebook Quietly Expands Downvote Button Test for Comments - June 24, 2025
- Instagram GIFs Return, But Only the Boring Ones - June 24, 2025
- Waze: What It Is, How It Works, and Why Drivers Love It? - June 24, 2025
Discover more from Techy247
Subscribe to get the latest posts sent to your email.


